Warning this is a tad lengthy, however I wanted to show you how this awesome piece came together!
A while back I got I posted about some thrifty finds I had. Well I finally got around to working w/ the small glass bowl with stem that I got for a whopping $1! I bought it w/ a plan since I had seen a lot of the cute pin cushions made this way.
Well if there is anything you may know about me in keeping up w/ my blog is that my bedroom is in black and white...I'm definitely a black/white kind of gal!
So I painted it black! I did go over and over about painting the stem white or silver (to match my refurbished desk more) but in the end I just decided on black!
I cut a circle that I figured was big enough....I don't really know the deminsions but I went w/ about 4 times as big as the mouth on my bowl.
I sewed around the circle (just like you would a yo-yo) I did not tied a knot yet or pull the thread too tight b/c I need to fill it so I then set that aside
To fill my little fabric baggy I made:
I cut two circle about the diameter what is going to be the top of my pin cushion (would be the bottom of the fabric baggy or yo-yo)
I sewed the 2 circles together but left a hole, turned it inside out
Then I filled it w/ rice....I would have just used batting but have seen a lot of people use other things so the pins wouldn't just push right through.
I hand sewed the hole shut and put my rice pillow into my fabric baggy
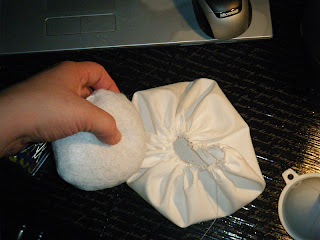
Then filled the fabric baggy the rest of the way w/ batting
I pulled the thread tight, knotted and clipped it to close my fabric baggy for good!
Some hot glue in my bowl
and a nicely placed filled fabric baggy
There she was.....finished right!?!? It just didn't look finished!..............
There it is in it's little home....still looks bare? Well it did to me.
Well I decided a little personalization would really help this cute little piece...but how to do it?? The best way would probably be paint but free hand painting would not cut it so I had to make a stencil and since the pin cushion was all put together the stencil would HAVE to be flexible but sturdy enough to where I would stay in the lines....Masking Tape it was....yes masking tape. I love masking tape!
There is my masking tape!
Here are some letter stickers that would be a pretty good size for what I was looking for....but my name starts w/ S and I am plain out of S in these stickers! I would have to use the backing!
I cut the outline from the sticker sheet and stuck it to my masking tape
I traced it and cut it out of the masking tape w/ my xacto knife
I stuck my new stencil in the center of my pin cushion
I splotched black paint over my stencil w/ a round paint sponge and then let it dry
Here is what my little station looks like with my now "finished" pin cushion. What do you think? Which is better? With the monogram or with out it?
Inspired by Blogland
Parties I'm Attending:
Homemaker on a Dime: Creative Bloggers' Party & Hop
More the Merrier Monday
Manic Monday
Make the Scene Monday
The Bunny Hop
The Creative Spark
Beyond the Picket Fence
Gluesticks: Get Your Brag On


How perfect is this! I LOVE the added monogram- it totally needed it! Cute pins too!;) Awesome job! -Jen
ReplyDeleteThanks! I agree, that monogram helped it out A LOT!
DeleteNice pin cushion! Looks better than the old pumpkin looking ones my mom used to have! :) Monogram definitely adds pizzazz!
ReplyDeleteI keep thinking I'm going to get rid of my "tomatoe" pincushion!! Thanks for the inspiration to finally do it! Thanks for visiting my blog too! I'm your newest follower!
ReplyDeleteSo very cute! Thanks for stopping by my blog, I'm following you now too.
ReplyDeleteHolly