Monday, October 31, 2011

Happy Halloween Mr. Potato Head!

                            (Our perfectly round pumpkin that Gregory picked at the pumpkin patch!)

                                          (Gregory getting ready to decorate his pumpkin!)


    Isn't he cute?  I admit he isn't very creative but what more could one expect from a 19 month olds pumpkin!?  I loved that with the Mr. Potato Head pieces for pumpkins are so easy even a toddler can do it. (I should probably make it clear that mommy or daddy had to start the hole in the pumpkin before Gregory could actually push the piece in!) And Gregory did!  He helped daddy push in the pieces and he was so amused by his new little friend that he got to help create!


  We had to sneak the pumpkin outside because Gregory wanted to play with him!  Another super awesome thing about the pumpkin Mr. Potato Head pieces......you can use them with an actual Mr. Potato Head which is on Gregory's Christmas list this year!

Okay so this sounded more like an advertisement...it is not  :)  I just wanted to share our pumpkin decorating as a family!

Happy Halloween everyone!

Inspired by Mr. Potato Head!

Parties I'm linking up to:


Beyond The Picket Fence


Photobucket


Thanks Ladies!

Sunday, October 30, 2011

Organizing with Plastic Baggies!

 
    I've been doing a lot of organizing and have thoroughly enjoyed seeing each post on "31 days to cheaply organize your home" by Organizing Made Fun!  So many really neat and of course CHEAP ways to organize.  Since I've been working on organizing my home these posts have been incredibly useful!  I haven't gotten to use any of these ideas yet but have specific plans to.  She is about to have a linky party on organizing tomorrow so I wanted to be able to link up with one of my favorite ways to organize!  It's so simple and I bet you already have all you need right in your own home!

                                             (Small plastic zipper bags that hold my Appliques)

Plastic zipper baggies....they come in so many different sizes for any of your organizing needs!  Also great when you have limited space!  Easily labeled with a sharpy if you want!

                                      (Sandwich size zipper baggy holding my small foam letters)

This weekend I have been really focusing on organizing my craft supplies as they have been spread about.  Some in my bedroom and some in the attic.  I'm specifically working on creating myself what I'm calling my "Craft Corner" which in itself is giving me a lot of smaller projects.  I have found zipper baggies very handy in organizing my crafts.  I even have some that have a hole punched out of a corner and connected with a ring to keep them together.


They also come in handy in my jewelry box which will be part of another post but I have some of my jewelry in baggies. (seen below) 


We also buy our meat in bulk because it's cheaper.  After we do a meat shopping trip we are usually covered for 5-6 months.  That is until my son starts eating more then we will have to buy meat more often!  Although we do have a Food Saver we often use Freezer Zipper Bags.

       (We label them with what is in the bag and the date the item was bagged so we use the older stuff first)

My favorite most recent way of using zipper baggies is for my sons clothes.  No not in his dresser but in his diaper bag!  I keep a spare change of clothes in Gregory's diaper bag in case of messes.  A quart size zipper baggy is perfect to keep that little outfit in.  It all stays together (shirt, pants, socks, etc) and doesn't get dirty from crumbs or whatever else might get into the bag.


I spent my first night away from Gregory this past Friday.  He spent the night at my parents house and although I did miss him I was able to go to a haunted house and sleep in a little with out having to worry about being woke up....it wasn't near as bad as I thought it was going to be.  But it helped knowing that I was able to run straight to him Saturday morning!  And he did so well too!  Anyways...so I packed his PJs (shirt, pants and socks) in a little baggy and then his outfit for Saturday in another baggy (shirt, pants, socks, matching toboggan b/c it's cold here now).  The outfits stayed together and all my stepmom had to do was pull the labeled baggy out and dress him.  Not that she isn't capable but it really helped in his overnight bag that the clothes weren't just thrown in there w/ his blankets and everything!

    Zipper baggies aren't the prettiest way to organize although you could probably beautify them pretty easily.  But they can be used over and over in so many different ways.

    Just think of all the ways you could organize with zipper baggies!  For more than just sandwiches!!  (Heck we don't even use them for sandwiches anymore, we have sandwich containers for that!!!  :)

Inspired by Organizing Made Fun


Linking up to the following party(s)


31DaysToCheaplyOrganizeYourHome />

Friday, October 28, 2011

Trick or Treat


    Please forgive my poor photography, I need to learn about lighting, I've decided this will make my pictures look better!  Anyways, I cannot take credit for the idea of making trick or treat buckets out of sand buckets, I saw this idea on FB through Market Mommies but loved the idea and it just so happened that it was nearing the end of summer and sand buckets were being clearanced everywhere!  So I bought a bunch of buckets, store clerks everywhere think I'm the weird sand bucket collector!  
    
    Of course just like most of my other projects this too was super easy!  A perfect Halloween gift for my tiny person and the tiny people that I watch! 


                                                           (Just an ordinary sand bucket)


   I removed the shovel so now I have tons of shovels...this will lead to a future post!  I took a white paint marker and wrote the child's name on the bucket.


 and a spider web on the side...let dry


I then shadowed the letters in the child's name and drew a little spider with a black paint marker (which turns out to be more like a tick b/c I only gave it 6 legs....yeah.....  Do not make this mistake  :)  I let the black dry before I put 2 red eyes with a red paint marker on the spider tick. Let it dry totally.


    The issue I then realized we were going to have is that tiny people are not always easy on things and the paint marker scratches off easily.  So we my husband, clear coated the buckets with clear spray paint.  I could have done this but he went ahead and did it so why not let him!

...........My son loves his bucket and I LOVE personalized items....win win!
There are a few more days before Halloween so you may want to go find some buckets!


Inspired by Market Mommies


Linking up to the following parties this week!  Check out their blogs, they are very inspiring!


Beyond The Picket Fence


Photobucket


Wednesday, October 26, 2011

A Little Fall Decorating

    As we've seen posted on so many blogs; fall has some of the most beautiful colors of all the seasons.  Of course Spring has many bright flowers that we are all super ready for after a long winter but fall....the colors are so warm.  I've seen so many beautiful decorating ideas for fall here in blogland and to be honest although I do have fall decorations here and there in my house I never thought too much of decorating a shelf or in some cases a mantel (which I don't have).  Just as I'm a newbie to blogland, this would mean I'm a newbie at decorating a shelf.  I decided my shelf could be on my hutch in my kitchen...it's pretty plain anyways.  So for the past couple of days I've come up with a few different designs and have settled on one I really like but will be sharing all three of them with you today.  You tell me which one you like the best!


    I do like this setup, I must admit.  It honestly cost me nothing...this year!  The metal bucket I had ordered from a company called LTD years ago.  It's actually a boot bucket and has a snowman on the other side but the color is so rich that turned around you can't tell it's meant for winter and I think makes a beautiful fall bucket.  But this usually sits under an end table right next to my front door and in the fall I put the silk flowers and leaves you see in this picture in the bucket and they peek out as you enter our front door.  I bought the flowers at Walmart years ago.  The small pumpkin is a cloth pumpkin I got two years ago at a fall baby shower.  The two larger pumpkins are glass pumpkins I bought at Hobby Lobby years ago.  I think it makes a nice piece, however on my hutch, I think it looks too bulky and these pieces had previous spots around my home that I rather liked!


    Because I found the piece to bulky before I tried the setup with out the bucket and it didn't pop for me.  And still these pieces would look better in their original spots.


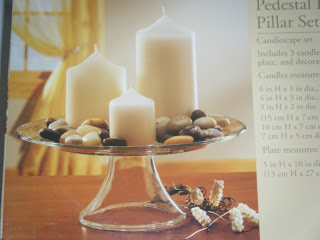
     This is my favorite design so this is the one I decided to keep.  In my previous designs I had forgotten that I had bought some mini pumpkins and mini gourds on our trip to the pumpkin patch this year.  All the gourds you see in this picture cost me $2....(sale was 3 for $1).  I LOVE tiny pumpkins they are just adorable and gourds fascinate me as no two are exactly alike....there is always a difference no matter how small or large the difference....they are neat!  This design has all the things that make me think "fall"...of course colors....deep and rich colors, pumpkins, gourds, leaves (falling leaves) which I already had as shown in my previous designs, I included my cloth pumpkin, a candle....no matter what season a scent can bring it home and this candle in this picture has such a rich color; the scent is Redwood (A tree!  Of course I think of trees in fall!) (the candle is a Woodwick Candle; if you have never had one go get one.......now, they are awesome!).  Everything is designed on top of and around what looks like a cake stand but is actually part of a candle centerpiece I had bought again...years ago
I also put a couple of the rocks that came with this around my gourds to fill the blank space.  Lastly but so important, the little bowl that I just pulled out of my cabinet contains fall colored M&Ms...mmmm my favorite!


So as a newbie at the shelf decorating did I do okay?  Total cost this year for this piece was less than $5.....$2 for pumpkins and gourds and $2.50 for M&Ms!


Inspired by All of your awesome decorated mantels and shelves

Linking up to the following parties, thank you ladies for allowing me to link up!


Beyond The Picket Fence
Photobucket


Tuesday, October 25, 2011

The Recipe Box Challenge

     My recipe box or boxes and index card book were a mess!  I would print different recipes offline or write down others recipes that I thought sounded good and stuff them in a box.  I should say that I'm not a good cook.  I can cook things that come in a box and I'm capable of following a recipe that has specific instructions but have been known to screw those up too!  But I do have many recipes and in my organizing my home I realized when organizing my kitchen for some reason I overlooked the mess of recipes I had.  Whether they were in boxes or not; they needed some serious straightening up.


    Finally after a few days of sitting and writing all of these loose recipes onto index cards that would properly fit into my recipe box where I would put them in alphabetical order.  Organized!  In this process I ended up with two new projects all of the sudden! 


    After being in blogland for a few weeks now I have viewed my fair share of blogs covering organization, crafts, sewing, refurbishing, etc....which have all inspired me in so many different ways.  I've been very amazed at how people take things that look like pure junk that one might throw away, give to a consignment shop or sell in a yard sale and make it into something beautiful.  So much so that when I go to yard sales or find something of my own that is looking rough my mind immediately goes to....what can I do to make that beautiful again!?  With that said...I now have an empty recipe box that is a dirty hot mess that I would have probably slipped into the yard sale box three weeks ago but today?  I see potential.  So I plan to make that empty dirty recipe box useful again!
 
.........on a larger scale.............
    While writing all of these recipes down I realized I've only actually cooked maybe 1/4 of them.  Again.....I am so not a cook and don't really enjoy it but I think that is b/c I'm not successful at it.  So....and here it is.....  I'm challenging myself.  Nothing too drastic but drastic enough for me being that I'm the opposite of Betty Crocker.  I am going to challenge myself to cook one recipe out of my box every week until I have made them all.  Perhaps I'll learn a thing or two about cooking or even about myself.  This may make my husband happy or not so much.....he loves food but isn't always thrilled about my cooking.  In this venture I'll keep you updated each week of the recipe I tried and how it turned out.  This ought to be very interesting!!!!  I hope you'll join me in this journey!

Inspired by my recipe box